My Blog List

Thursday, 22 February 2018

TCP/IP Hijacking


TCP/IP Hijacking

TCP/IP Hijacking is when an authorized user gains access to a genuine network connection of another user. It is done in order to bypass the password authentication which is normally the start of a session.
In theory, a TCP/IP connection is established as shown below −
To hijack this connection, there are two possibilities −
  • Find the seq which is a number that increases by 1, but there is no chance to predict it.
  • The second possibility is to use the Man-in-the-Middle attack which, in simple words, is a type of network sniffing. For sniffing, we use tools like Wireshark or Ethercap.

Example

An attacker monitors the data transmission over a network and discovers the IP’s of two devices that participate in a connection.
When the hacker discovers the IP of one of the users, he can put down the connection of the other user by DoS attack and then resume communication by spoofing the IP of the disconnected user.

Shijack

In practice, one of the best TCP/IP hijack tools is Shijack. It is developed using Python language and you can download it from the following link − https://packetstormsecurity.com/sniffers/shijack.tgz
Here is an example of a Shijack command −
root:/home/root/hijack# ./shijack eth0 192.168.0.100 53517 192.168.0.200 23
Here, we are trying to hijack a Telnet connection between the two hosts.

Hunt

Hunt is another popular tool that you can use to hijack a TCP/IP connection. It can be downloaded from − https://packetstormsecurity.com/sniffers/hunt/

Quick Tip

All unencrypted sessions are vulnerable to TCP/IP session hijacking, so you should be using encrypted protocols as much as possible. Or, you should use double authentication techniques to keep the session secured.

Trojan Attacks


Trojan Attacks

Trojans are non-replication programs; they don’t reproduce their own codes by attaching themselves to other executable codes. They operate without the permissions or knowledge of the computer users.
Trojans hide themselves in healthy processes. However we should underline that Trojans infect outside machines only with the assistance of a computer user, like clicking a file that comes attached with email from an unknown person, plugging USB without scanning, opening unsafe URLs.
Trojans have several malicious functions −
  • They create backdoors to a system. Hackers can use these backdoors to access a victim system and its files. A hacker can use Trojans to edit and delete the files present on a victim system, or to observe the activities of the victim.
  • Trojans can steal all your financial data like bank accounts, transaction details, PayPal related information, etc. These are called Trojan-Banker.
  • Trojans can use the victim computer to attack other systems using Denial of Services.
  • Trojans can encrypt all your files and the hacker may thereafter demand money to decrypt them. These are Ransomware Trojans.
  • They can use your phones to send SMS to third parties. These are called SMS Trojans.

Trojan Information

If you have found a virus and want to investigate further regarding its function, then we will recommend that you have a look at the following virus databases, which are offered generally by antivirus vendors.
  • Kaspersky Virus database − https://www.kaspersky.com
  • F-secure − https://www.f-secure.com
  • Symantec – Virus Encyclopedia − https://www.symantec.com

Quick Tips

  • Install a good antivirus and keep it updated.
  • Don’t open email attachments coming from unknown sources.
  • Don’t accept invitation from unknown people in social media.
  • Don’t open URLs sent by unknown people or URLs that are in weird form.

Metasploit


Metasploit

Metasploit is one of the most powerful exploit tools. Most of its resources can be found at: https://www.metasploit.com. It comes in two versions − commercial and free edition. There are no major differences in the two versions, so in this tutorial, we will be mostly using the Community version (free) of Metasploit.
As an Ethical Hacker, you will be using “Kali Distribution” which has the Metasploit community version embedded in it along with other ethical hacking tools. But if you want to install Metasploit as a separate tool, you can easily do so on systems that run on Linux, Windows, or Mac OS X.
The hardware requirements to install Metasploit are −
  • 2 GHz+ processor
  • 1 GB RAM available
  • 1 GB+ available disk space
Matasploit can be used either with command prompt or with Web UI.
To open in Kali, go to Applications → Exploitation Tools → metasploit.
After Metasploit starts, you will see the following screen. Highlighted in red underline is the version of Metasploit.

Exploits of Metasploit

From Vulnerability Scanner, we found that the Linux machine that we have for test is vulnerable to FTP service. Now, we will use the exploit that can work for us. The command is −
use “exploit path”
The screen will appear as follows −
Then type mfs> show options in order to see what parameters you have to set in order to make it functional. As shown in the following screenshot, we have to set RHOST as the “target IP”.
We type msf> set RHOST 192.168.1.101 and msf>set RPORT 21
Then, type mfs>run. If the exploit is successful, then it will open one session that you can interact with, as shown in the following screenshot.

Metasploit Payloads

Payload, in simple terms, are simple scripts that the hackers utilize to interact with a hacked system. Using payloads, they can transfer data to a victim system.
Metasploit payloads can be of three types −
  • Singles − Singles are very small and designed to create some kind of communication, then move to the next stage. For example, just creating a user.
  • Staged − It is a payload that an attacker can use to upload a bigger file onto a victim system.
  • Stages − Stages are payload components that are downloaded by Stagers modules. The various payload stages provide advanced features with no size limits such as Meterpreter and VNC Injection.

Payload Usage − Example

We use the command show payloads. With this exploit, we can see the payloads that we can use, and it will also show the payloads that will help us upload /execute files onto a victim system.
To set the payload that we want, we will use the following command −
set PAYLOAD payload/path
Set the listen host and listen port (LHOST, LPORT) which are the attacker IP and port. Then set remote host and port (RPORT, LHOST) which are the victim IP and port.
Type “exploit”. It will create a session as shown below −
Now we can play with the system according to the settings that this payload offers.

Exploitation


Exploitation

Exploitation is a piece of programmed software or script which can allow hackers to take control over a system, exploiting its vulnerabilities. Hackers normally use vulnerability scanners like Nessus, Nexpose, OpenVAS, etc. to find these vulnerabilities.
Metasploit is a powerful tool to locate vulnerabilities in a system.
Based on the vulnerabilities, we find exploits. Here, we will discuss some of the best vulnerability search engines that you can use.

Exploit Database

www.exploit-db.com is the place where you can find all the exploits related to a vulnerability.

Common Vulnerabilities and Exposures

Common Vulnerabilities and Exposures (CVE) is the standard for information security vulnerability names. CVE is a dictionary of publicly known information security vulnerabilities and exposures. It’s free for public use. https://cve.mitre.org

National Vulnerability Database

National Vulnerability Database (NVD) is the U.S. government repository of standards based vulnerability management data. This data enables automation of vulnerability management, security measurement, and compliance. You can locate this database at − https://nvd.nist.gov
NVD includes databases of security checklists, security-related software flaws, misconfigurations, product names, and impact metrics.
In general, you will see that there are two types of exploits −
  • Remote Exploits − These are the type of exploits where you don’t have access to a remote system or network. Hackers use remote exploits to gain access to systems that are located at remote places.
  • Local Exploits − Local exploits are generally used by a system user having access to a local system, but who wants to overpass his rights.

Quick Fix

Vulnerabilities generally arise due to missing updates, so it is recommended that you update your system on a regular basis, for example, once a week.
In Windows environment, you can activate automatic updates by using the options available in the Control Panel → System and Security → Windows Updates.
In Linux Centos, you can use the following command to install automatic update package.
yum -y install yum-cron

DNS Poisoning


DNS Poisoning

DNS Poisoning is a technique that tricks a DNS server into believing that it has received authentic information when, in reality, it has not. It results in the substitution of false IP address at the DNS level where web addresses are converted into numeric IP addresses. It allows an attacker to replace IP address entries for a target site on a given DNS server with IP address of the server controls. An attacker can create fake DNS entries for the server which may contain malicious content with the same name.
For instance, a user types www.google.com, but the user is sent to another fraud site instead of being directed to Google’s servers. As we understand, DNS poisoning is used to redirect the users to fake pages which are managed by the attackers.

DNS Poisoning − Exercise

Let’s do an exercise on DNS poisoning using the same tool, Ettercap.
DNS Poisoning is quite similar to ARP Poisoning. To initiate DNS poisoning, you have to start with ARP poisoning, which we have already discussed in the previous chapter. We will use DNS spoof plugin which is already there in Ettercap.
Step 1 − Open up the terminal and type “nano etter.dns”. This file contains all entries for DNS addresses which is used by Ettercap to resolve the domain name addresses. In this file, we will add a fake entry of “Facebook”. If someone wants to open Facebook, he will be redirected to another website.
Step 2 − Now insert the entries under the words “Redirect it to www.linux.org”. See the following example −
Step 3 − Now save this file and exit by saving the file. Use “ctrl+x” to save the file.
Step 4 − After this, the whole process is same to start ARP poisoning. After starting ARP poisoning, click on “plugins” in the menu bar and select “dns_spoof” plugin.
Step 5 − After activating the DNS_spoof, you will see in the results that facebook.com will start spoofed to Google IP whenever someone types it in his browser.
It means the user gets the Google page instead of facebook.com on their browser.
In this exercise, we saw how network traffic can be sniffed through different tools and methods. Here a company needs an ethical hacker to provide network security to stop all these attacks. Let’s see what an ethical hacker can do to prevent DNS Poisoning.

Defenses against DNS Poisoning

As an ethical hacker, your work could very likely put you in a position of prevention rather than pen testing. What you know as an attacker can help you prevent the very techniques you employ from the outside.
Here are defenses against the attacks we just covered from a pen tester’s perspective −
  • Use a hardware-switched network for the most sensitive portions of your network in an effort to isolate traffic to a single segment or collision domain.
  • Implement IP DHCP Snooping on switches to prevent ARP poisoning and spoofing attacks.
  • Implement policies to prevent promiscuous mode on network adapters.
  • Be careful when deploying wireless access points, knowing that all traffic on the wireless network is subject to sniffing.
  • Encrypt your sensitive traffic using an encrypting protocol such as SSH or IPsec.
  • Port security is used by switches that have the ability to be programmed to allow only specific MAC addresses to send and receive data on each port.
  • IPv6 has security benefits and options that IPv4 does not have.
  • Replacing protocols such as FTP and Telnet with SSH is an effective defense against sniffing. If SSH is not a viable solution, consider protecting older legacy protocols with IPsec.
  • Virtual Private Networks (VPNs) can provide an effective defense against sniffing due to their encryption aspect.
  • SSL is a great defense along with IPsec.

Summary

In this chapter, we discussed how attackers can capture and analyze all the traffic by placing a packet sniffer in a network. With a real-time example, we saw how easy it is to get the credentials of a victim from a given network. Attackers use MAC attacks, ARP and DNS poisoning attacks to sniff the network traffic and get hold of sensitive information such as email conversations and passwords.

ARP Poisoning


ARP Poisoning

Address Resolution Protocol (ARP) is a stateless protocol used for resolving IP addresses to machine MAC addresses. All network devices that need to communicate on the network broadcast ARP queries in the system to find out other machines’ MAC addresses. ARP Poisoning is also known as ARP Spoofing.
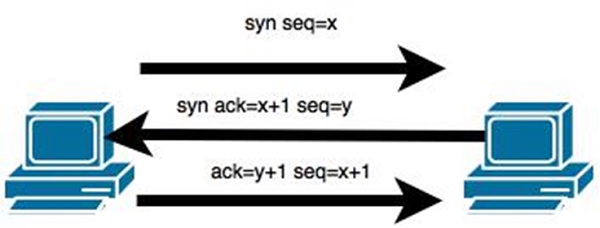
Here is how ARP works −
  • When one machine needs to communicate with another, it looks up its ARP table.
  • If the MAC address is not found in the table, the ARP_request is broadcasted over the network.
  • All machines on the network will compare this IP address to MAC address.
  • If one of the machines in the network identifies this address, then it will respond to the ARP_request with its IP and MAC address.
  • The requesting computer will store the address pair in its ARP table and communication will take place.

What is ARP Spoofing?

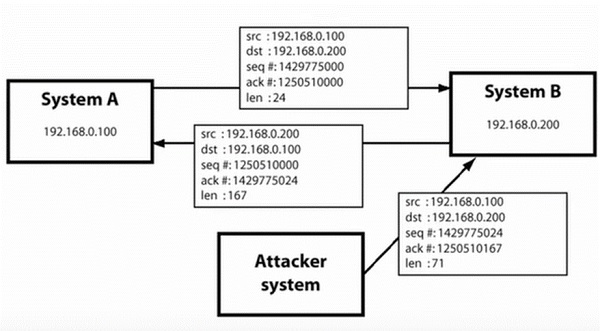
ARP packets can be forged to send data to the attacker’s machine.
  • ARP spoofing constructs a large number of forged ARP request and reply packets to overload the switch.
  • The switch is set in forwarding modeand after the ARP table is flooded with spoofed ARP responses, the attackers can sniff all network packets.
Attackers flood a target computer ARP cache with forged entries, which is also known as poisoning. ARP poisoning uses Man-in-the-Middle access to poison the network.

What is MITM?

The Man-in-the-Middle attack (abbreviated MITM, MitM, MIM, MiM, MITMA) implies an active attack where the adversary impersonates the user by creating a connection between the victims and sends messages between them. In this case, the victims think that they are communicating with each other, but in reality, the malicious actor controls the communication.
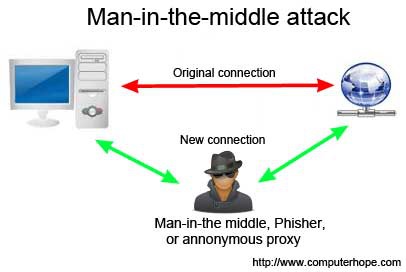
A third person exists to control and monitor the traffic of communication between two parties. Some protocols such as SSL serve to prevent this type of attack.

ARP Poisoning − Exercise

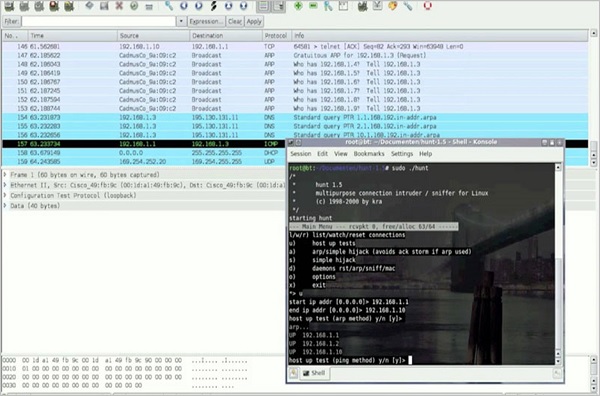
In this exercise, we have used BetterCAP to perform ARP poisoning in LAN environment using VMware workstation in which we have installed Kali Linux and Ettercap tool to sniff the local traffic in LAN.
For this exercise, you would need the following tools −
  • VMware workstation
  • Kali Linux or Linux Operating system
  • Ettercap Tool
  • LAN connection
Note − This attack is possible in wired and wireless networks. You can perform this attack in local LAN.
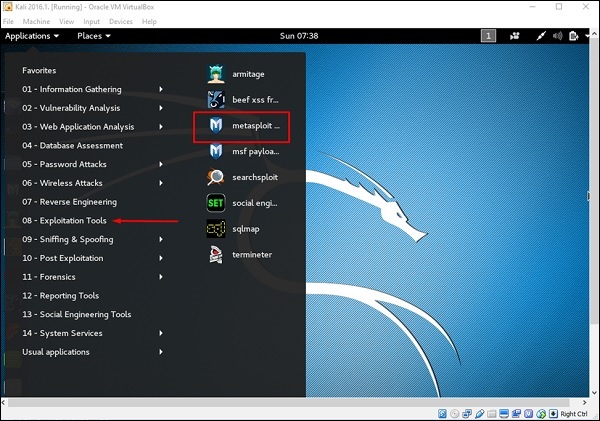
Step 1 − Install the VMware workstation and install the Kali Linux operating system.
Step 2 − Login into the Kali Linux using username pass “root, toor”.
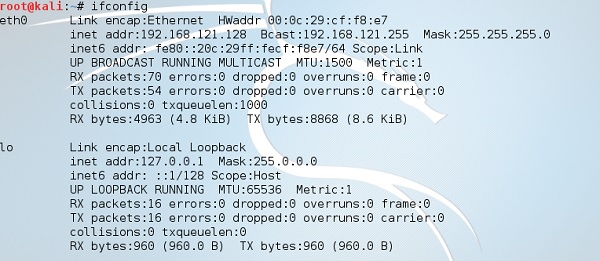
Step 3 − Make sure you are connected to local LAN and check the IP address by typing the command ifconfig in the terminal.
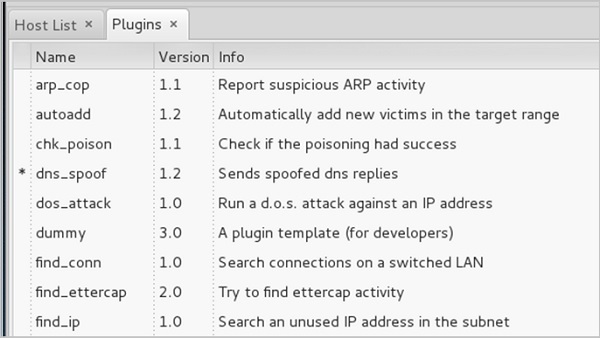
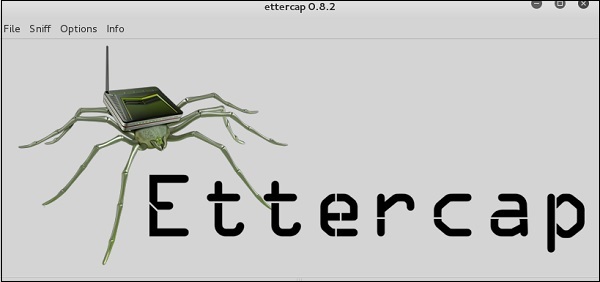
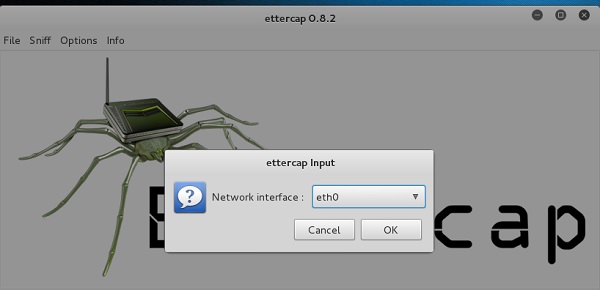
Step 4 − Open up the terminal and type “Ettercap –G” to start the graphical version of Ettercap.
Step 5 − Now click the tab “sniff” in the menu bar and select “unified sniffing” and click OK to select the interface. We are going to use “eth0” which means Ethernet connection.
Step 6 − Now click the “hosts” tab in the menu bar and click “scan for hosts”. It will start scanning the whole network for the alive hosts.
Step 7 − Next, click the “hosts” tab and select “hosts list” to see the number of hosts available in the network. This list also includes the default gateway address. We have to be careful when we select the targets.
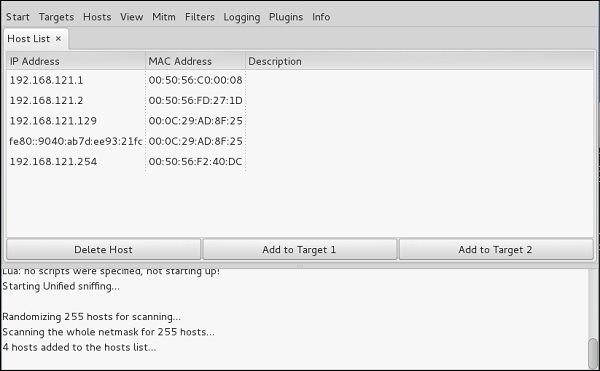
Step 8 − Now we have to choose the targets. In MITM, our target is the host machine, and the route will be the router address to forward the traffic. In an MITM attack, the attacker intercepts the network and sniffs the packets. So, we will add the victim as “target 1” and the router address as “target 2.”
In VMware environment, the default gateway will always end with “2” because “1” is assigned to the physical machine.
Step 9 − In this scenario, our target is “192.168.121.129” and the router is “192.168.121.2”. So we will add target 1 as victim IP and target 2 as router IP.
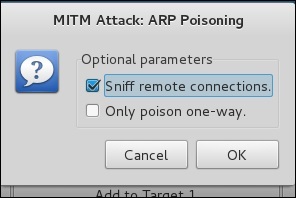
Step 10 − Now click on “MITM” and click “ARP poisoning”. Thereafter, check the option “Sniff remote connections” and click OK.
Step 11 − Click “start” and select “start sniffing”. This will start ARP poisoning in the network which means we have enabled our network card in “promiscuous mode” and now the local traffic can be sniffed.
Note − We have allowed only HTTP sniffing with Ettercap, so don’t expect HTTPS packets to be sniffed with this process.
Step 12 − Now it’s time to see the results; if our victim logged into some websites. You can see the results in the toolbar of Ettercap.
This is how sniffing works. You must have understood how easy it is to get the HTTP credentials just by enabling ARP poisoning.
ARP Poisoning has the potential to cause huge losses in company environments. This is the place where ethical hackers are appointed to secure the networks.
Like ARP poisoning, there are other attacks such as MAC flooding, MAC spoofing, DNS poisoning, ICMP poisoning, etc. that can cause significant loss to a network.
In the next chapter, we will discuss another type of attack known as DNS poisoning.

Sniffing Tools


Sniffing Tools

There are so many tools available to perform sniffing over a network, and they all have their own features to help a hacker analyze traffic and dissect the information. Sniffing tools are extremely common applications. We have listed here some of the interesting ones −
  • BetterCAP − BetterCAP is a powerful, flexible and portable tool created to perform various types of MITM attacks against a network, manipulate HTTP, HTTPS and TCP traffic in real-time, sniff for credentials, and much more.
  • Ettercap − Ettercap is a comprehensive suite for man-in-the-middle attacks. It features sniffing of live connections, content filtering on the fly and many other interesting tricks. It supports active and passive dissection of many protocols and includes many features for network and host analysis.
  • Wireshark − It is one of the most widely known and used packet sniffers. It offers a tremendous number of features designed to assist in the dissection and analysis of traffic.
  • Tcpdump − It is a well-known command-line packet analyzer. It provides the ability to intercept and observe TCP/IP and other packets during transmission over the network. Available at www.tcpdump.org.
  • WinDump − A Windows port of the popular Linux packet sniffer tcpdump, which is a command-line tool that is perfect for displaying header information.
  • OmniPeek − Manufactured by WildPackets, OmniPeek is a commercial product that is the evolution of the product EtherPeek.
  • Dsniff − A suite of tools designed to perform sniffing with different protocols with the intent of intercepting and revealing passwords. Dsniff is designed for Unix and Linux platforms and does not have a full equivalent on the Windows platform.
  • EtherApe − It is a Linux/Unix tool designed to display graphically a system's incoming and outgoing connections.
  • MSN Sniffer − It is a sniffing utility specifically designed for sniffing traffic generated by the MSN Messenger application.
  • NetWitness NextGen − It includes a hardware-based sniffer, along with other features, designed to monitor and analyze all traffic on a network. This tool is used by the FBI and other law enforcement agencies.
A potential hacker can use any of these sniffing tools to analyze traffic on a network and dissect information.